Which tab lets you set worksheet print option? ✅ Mới nhất
Mẹo Hướng dẫn Which tab lets you set worksheet print option? Mới Nhất
Lê Minh Phương đang tìm kiếm từ khóa Which tab lets you set worksheet print option? được Update vào lúc : 2022-11-28 19:50:17 . Với phương châm chia sẻ Bí kíp về trong nội dung bài viết một cách Chi Tiết 2022. Nếu sau khi đọc nội dung bài viết vẫn ko hiểu thì hoàn toàn có thể lại phản hồi ở cuối bài để Mình lý giải và hướng dẫn lại nha.1.4 Printing
Learning Objectives
Use the Page Layout tab to prepare a worksheet for printing.Add headers and footers to a printed worksheet.Examine how to print worksheets and workbooks. Nội dung chính Show- 1.4 PrintingLearning ObjectivesHeaders and FootersPrinting Worksheets and WorkbooksKey TakeawaysWhich tab is useful for printing print setting Excel spreadsheet?What tab gives you the option to set the width for printing in Excel?
Once you have completed a workbook, it is good practice to select the appropriate settings for printing. These settings are in the Page Layout tab of the Ribbon and discussed in this section of the chapter.
Page Setup
Follow-along file: Excel Objective 1.0 (Use file Excel Objective 1.14 if you are starting with this skill.)
Before you can properly print the worksheets in a workbook, you must establish appropriate settings. The following steps explain several of the commands in the Page Layout tab of the Ribbon used to prepare a worksheet for printing:
Open the Unit Sales Rank worksheet by left clicking on the worksheet tab.Click the Page Layout tab of the Ribbon.Click the Margins button in the Page Setup group of commands. This will open a drop-down list of options for setting the margins of your printed document.Click the Wide option from the Margins drop-down list.Open the Sales by Month worksheet by left clicking on the worksheet tab.Click the Page Layout tab of the Ribbon (see Figure 1.62 "Page Layout Commands for Printing").Click the Margins button in the Page Setup group of commands.Click the Narrow option from the Margins drop-down list.Click the Orientation button in the Page Setup group of commands.Click the Landscape option.Click the down arrow to the right of the Width button in the Scale to Fit group of commands.Click the 1 Page option from the drop-down list.Click the down arrow to the right of the Height button in the Scale to Fit group of commands.Click the 1 Page option from the drop-down list. This step along with step 12 will automatically reduce the worksheet so that it fits on one piece of paper. It is very common for professionals to create worksheets that fit within the width of the paper being used. However, for long data sets, you may need to set the height to more than one page. Table 1.2 "Printing Resources: Purpose and Use for Page Setup Commands" provides a list of commands found in the Page Layout tab of the RibbonWhy?
Use Print Settings
Because professionals often share Excel workbooks, it is a good practice to select the appropriate print settings in the Page Layout tab even if you do not intend to print the worksheets in a workbook. It can be extremely frustrating for recipients of a workbook who wish to print your worksheets to find that the necessary print settings have not been selected. This may reflect poorly on your attention to detail, especially if the recipient of the workbook is your boss.
Figure 1.62 Page Layout Commands for Printing

Table 1.2 Printing Resources: Purpose and Use for Page Setup Commands
CommandPurposeUseMargins Sets the top, bottom, right, and left margin space for the printed document 1. Click the Page Layout tab of the Ribbon. 2. Click the Margin button. 3. Click one of the preset margin options or click Custom Margins. Orientation Sets the orientation of the printed document to either portrait or landscape 1. Click the Page Layout tab of the Ribbon. 2. Click the Orientation button. 3. Click one of the preset orientation options. Size Sets the paper size for the printed document 1. Click the Page Layout tab of the Ribbon. 2. Click the Size button. 3. Click one of the preset paper size options or click More Paper Sizes. Print Area Used for printing only a specific area or range of cells on a worksheet 1. Highlight the range of cells on a worksheet that you wish to print. 2. Click the Page Layout tab of the Ribbon. 3. Click the Print Area button. 4. Click the Set Print Area option from the drop-down list. Breaks Allows you to manually set the page breaks on a worksheet 1. Activate a cell on the worksheet where the page break should be placed. Breaks are created above and to the left of the activated cell. 2. Click the Page Layout tab of the Ribbon. 3. Click the Breaks button. 4. Click the Insert Page Break option from the drop-down list. Background Adds a picture behind the cell locations in a worksheet 1. Click the Page Layout tab of the Ribbon. 2. Click the Background button. 3. Select a picture stored on your computer or network. Print Titles Used when printing large data sets that are several pages long. This command will repeat the column headings the top of each printed page. 1. Click the Page Layout tab of the Ribbon. 2. Click the Print Titles button. 3. Click in the Rows to Repeat Top input box in the Page Setup dialog box. 4. Click any cell in the row that contains the column headings for your worksheet. 5. Click the OK button the bottom of the Page Setup dialog box.Headers and Footers
Follow-along file: Excel Objective 1.0 (Use file Excel Objective 1.15 if you are starting with this skill.)
When printing worksheets from Excel, it is common to add headersSpace the top of a printed worksheet that contains information such as the date, page number, file name, company name, and so on. and footersSpace the bottom of a printed worksheet that contains information such as the date, page number, file name, company name, and so on. to the printed document. Information in the header or footer could include the date, page number, file name, company name, and so on. The following steps explain how to add headers and footers to the Excel Objective 1.0 workbook:
Open the Unit Sales Rank worksheet by left clicking on the worksheet tab.Click the Insert tab of the Ribbon.Click the Header & Footer button in the Text group of commands. You will see the Design tab added to the Ribbon; this is used for creating the headers and footers for the printed worksheet. Also, this will convert the view of the worksheet from Normal to Page Layout (see Figure 1.63 "Design Tab for Creating Headers and Footers").
Figure 1.63 Design Tab for Creating Headers and Footers
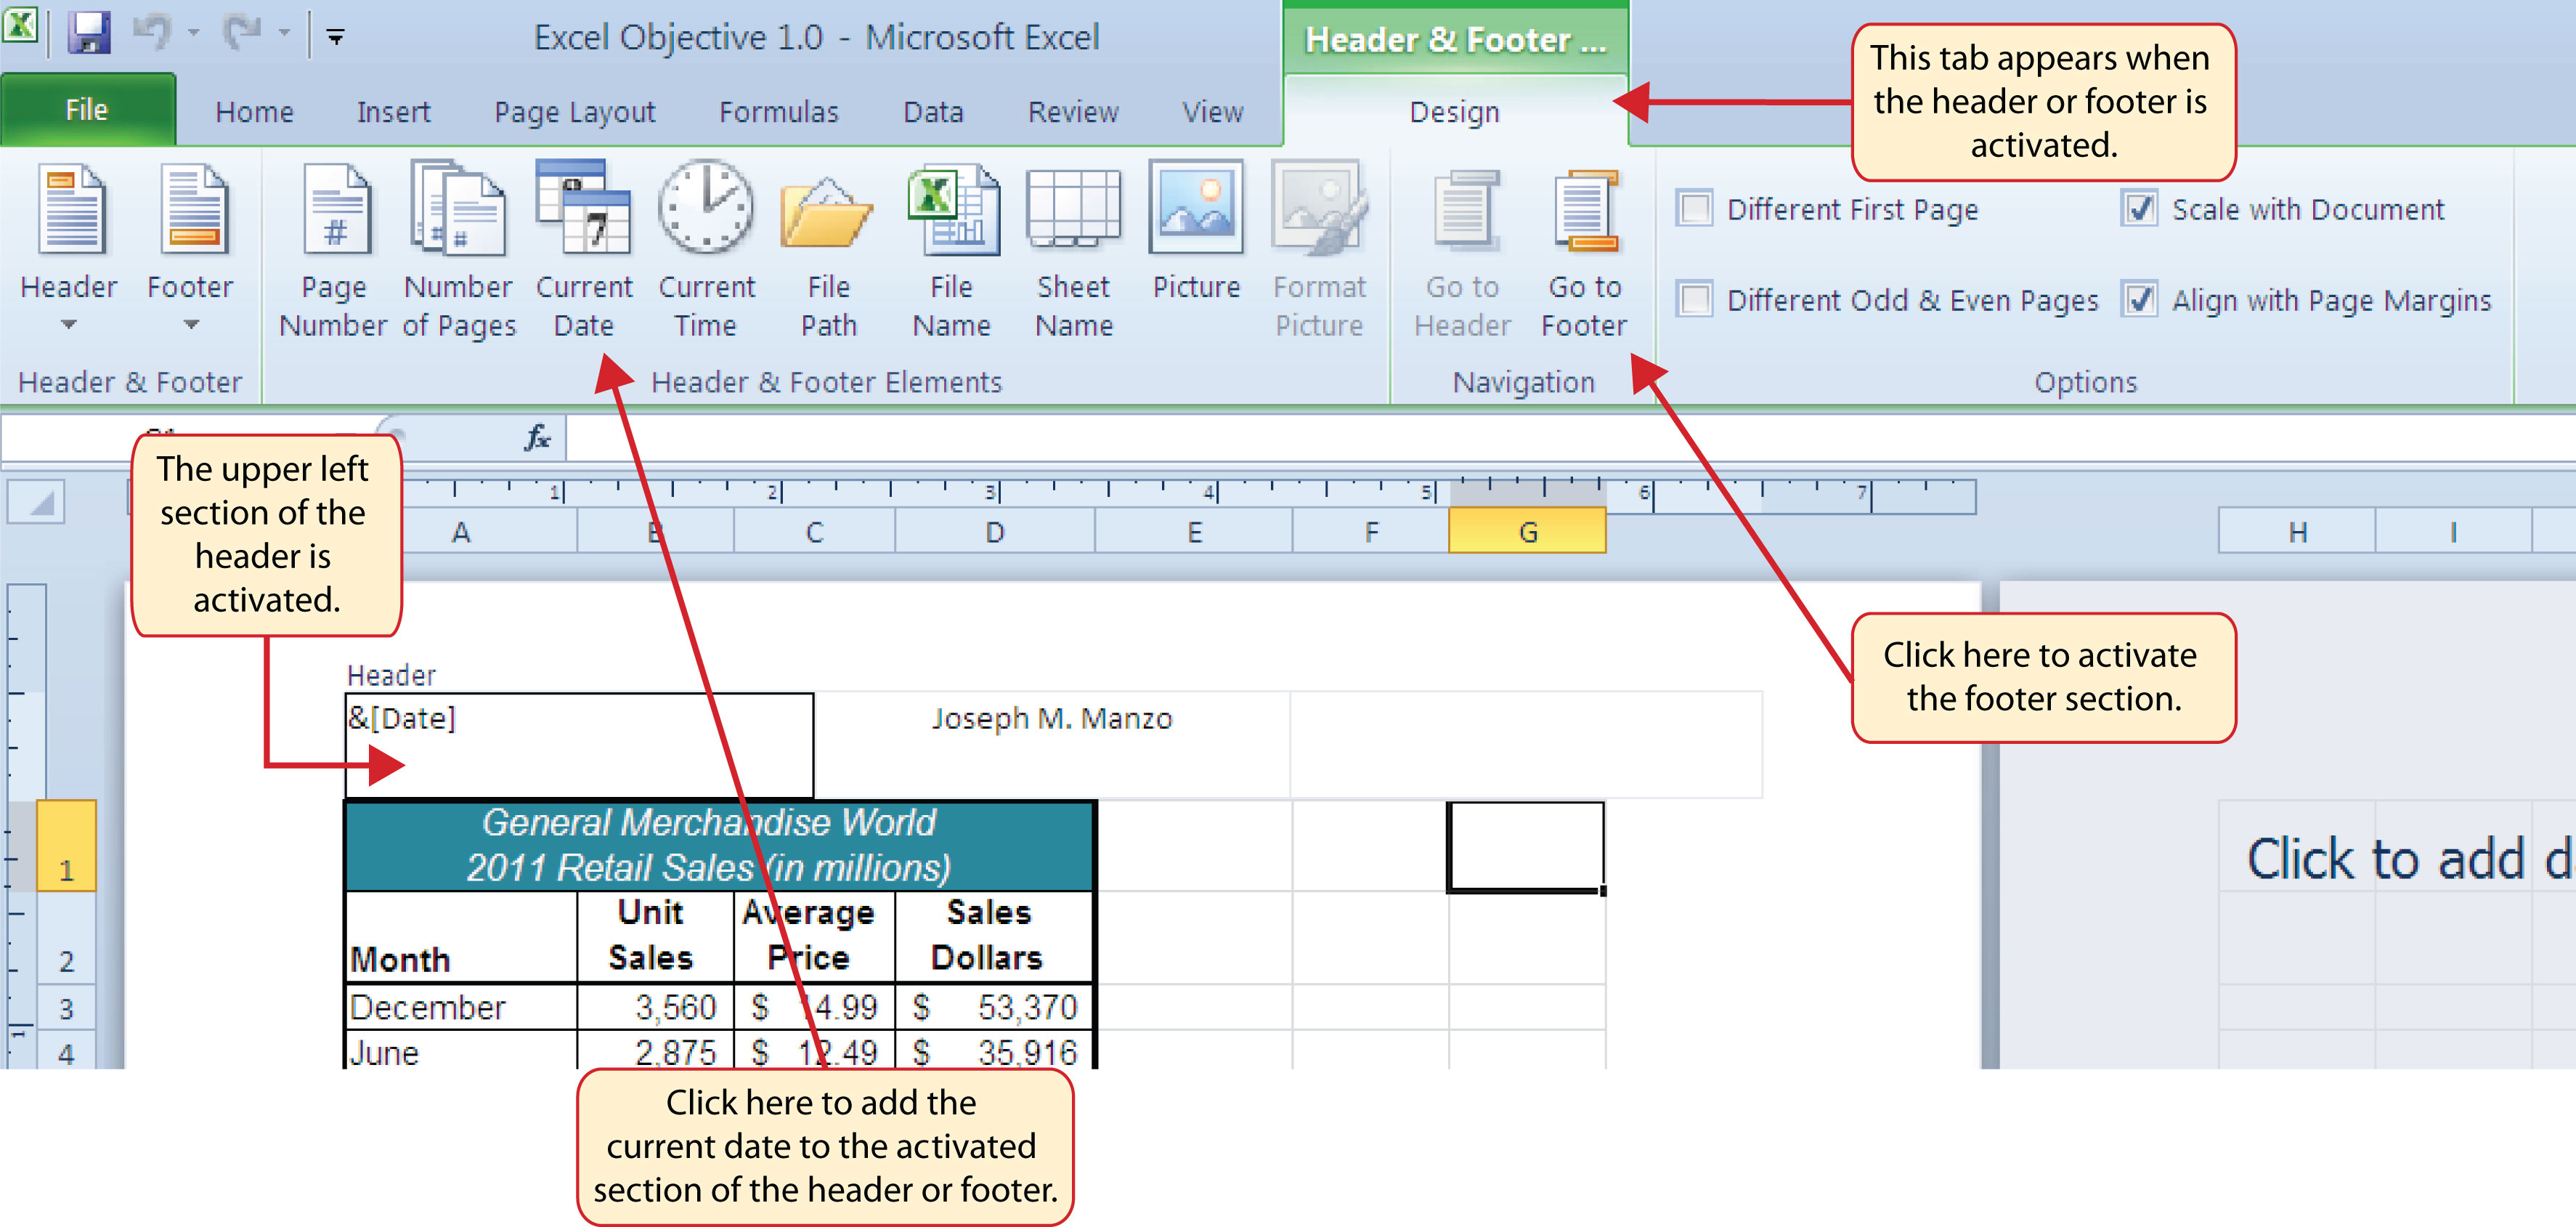 Type your name in the center section of the Header.Place the mouse pointer over the left section of the Header and left click (see Figure 1.63 "Design Tab for Creating Headers and Footers").Click
the Current Date button in the Header & Footer Elements group of commands in the Design tab of the Ribbon.Click the Go to Footer button in the Navigation group of commands in the Design tab of the Ribbon.Place the mouse pointer over the far right section of the footer and left click.Click the Page Number button in the Header & Footer Elements group of commands in the Design tab of the Ribbon.Click any cell location outside the header or footer area.
The Design tab for creating headers and footers will disappear.
Type your name in the center section of the Header.Place the mouse pointer over the left section of the Header and left click (see Figure 1.63 "Design Tab for Creating Headers and Footers").Click
the Current Date button in the Header & Footer Elements group of commands in the Design tab of the Ribbon.Click the Go to Footer button in the Navigation group of commands in the Design tab of the Ribbon.Place the mouse pointer over the far right section of the footer and left click.Click the Page Number button in the Header & Footer Elements group of commands in the Design tab of the Ribbon.Click any cell location outside the header or footer area.
The Design tab for creating headers and footers will disappear.Click the Normal view button in the lower right side of the Status Bar (see Figure 1.64 "Worksheet in Page Layout View").
Figure 1.64 Worksheet in Page Layout View
 Open the Sales by Month worksheet by left clicking the worksheet tab.Repeat steps 2 through 11 to create the same header and footer for this worksheet.
Printing Worksheets and Workbooks
Follow-along file: Excel Objective 1.0 (Use file Excel Objective 1.16 if you are starting with this skill.)
Once you have established the print settings for the worksheets in a workbook and have added headers and footers, you are ready to print your worksheets. The following steps explain how to print the worksheets in the Excel Objective 1.0 workbook:
Open the Unit Sales Rank worksheet by left clicking on the worksheet tab.Click the File tab on the Ribbon.Click the Print option on the left side of the Backstage view (see Figure 1.65 "Print Preview"). On the right side of the Backstage view, you will be able to see a preview of your printed worksheet.
Figure 1.65 Print Preview
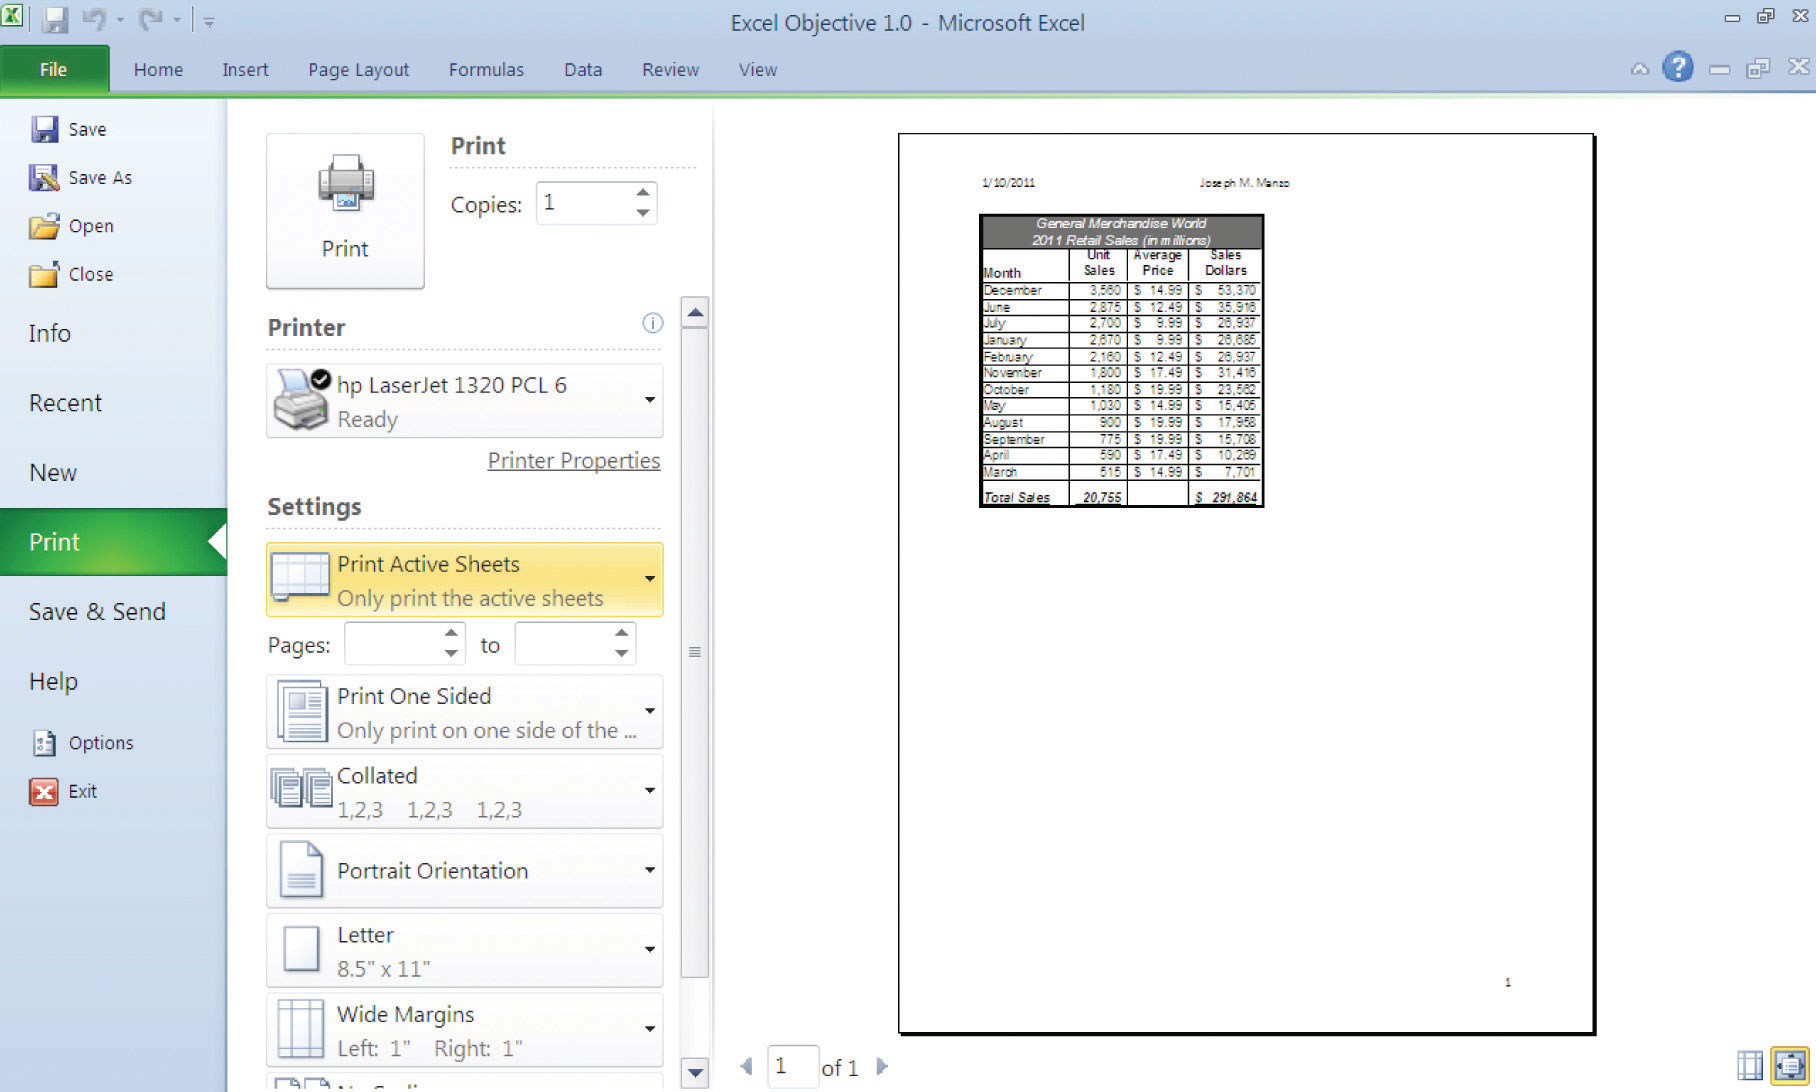 Click the Print Active Sheets button in the Print section of the Backstage view (see Figure
1.65 "Print Preview").Click the Print Entire Workbook option from the drop-down list. This will print all worksheets in a workbook when the Print button is clicked.Click the Next Page arrow the bottom of the preview window.Click the Print button.Click the trang chủ tab of the Ribbon.Save and close the Excel Objective 1.0 workbook.
Click the Print Active Sheets button in the Print section of the Backstage view (see Figure
1.65 "Print Preview").Click the Print Entire Workbook option from the drop-down list. This will print all worksheets in a workbook when the Print button is clicked.Click the Next Page arrow the bottom of the preview window.Click the Print button.Click the trang chủ tab of the Ribbon.Save and close the Excel Objective 1.0 workbook.Key Takeaways
- The
commands in the Page Layout tab of the Ribbon are used to prepare a worksheet for printing.You can add headers and footers to a worksheet to show key information such as page numbers, the date, the file name, your name, and so on.The Print commands are in the File tab of the Ribbon.
Exercises
Which of the following commands is used to print the column headings in a worksheet the top of each printed page for a worksheet that contains 100 rows of data?
the Header & Footer command in the Insert tab of the Ribbonthe Print Titles command in the Page Layout tab of the Ribbonthe Insert command in the trang chủ tab of the Ribbonthe Conditional Formatting command in the trang chủ tab of the RibbonWhich of the following is true with respect to printing Excel worksheets?
Setting the Width and Height drop-down lists to 1 Page will ensure that all the worksheets in a workbook are printed on one page.The page layout settings must be set for each worksheet in a workbook.You can print only one worksheet a time in a workbook that contains multiple worksheets.All of the above are true.Which tab is useful for printing print setting Excel spreadsheet?
Let's have a look how that works:. On the Page Layout tab, configure the required print settings and press Ctrl + P.. In the Print Preview window, open the Printer drop-down list, and select Print to File.. Click the Print button.. Choose where to save a .png file containing the output..What tab gives you the option to set the width for printing in Excel?
To switch the default paper size, go to Page Layout > Page Setup > Size, and then choose the size you want. Use the Print Area command (Page Setup group) to exclude any columns or rows that you don't need to print. Tải thêm tài liệu liên quan đến nội dung bài viết Which tab lets you set worksheet print option?